Goji Cacao Bites

I know you’ve missed me. I’m sorry I’ve been spending very little time with you lately, it’s just I’ve gotten so busy with work and other obligations…I know, a pathetic excuse. The only way left to show you how sorry I am is with chocolate.

All is forgiven? Fantastic! I knew you couldn’t stay mad at me for long.

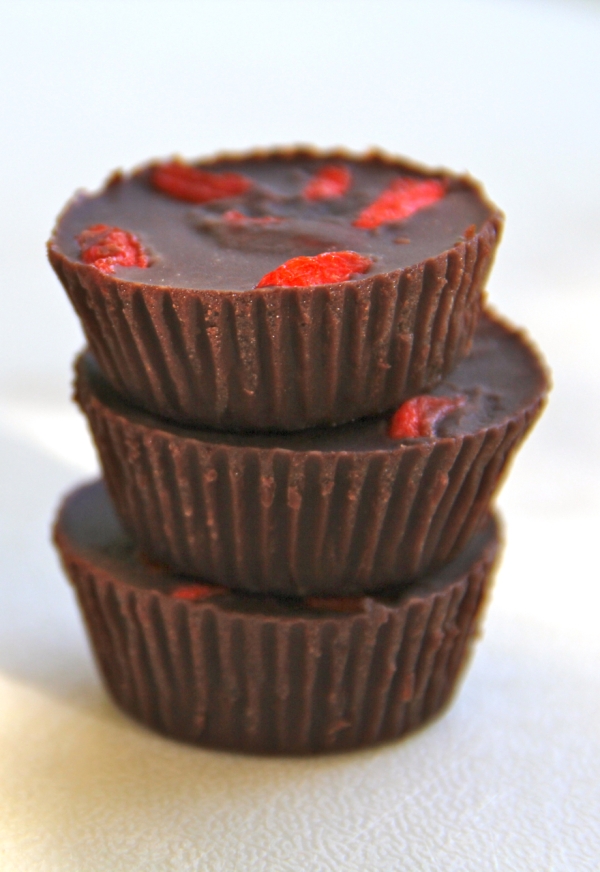
I’ll get the cons of this recipe out of the way, if you want to call them that. The first thing you should know is that these little guys need to stored in the fridge or freezer, or this happens:

Granted, these were sitting outside in 95 degree temperatures for several minutes while I took pictures. They won’t melt like that in your house (unless your house is 95 degrees, and I’ve been there…), but they will definitely soften. Coconut oil is not to be trusted and will melt at just above room temperature, so these must be cold. The great part is that they don’t taste or feel very cold, even if stored in the freezer. Even when “frozen” they’re still soft quite an enjoyably edible texture, almost just like a cool, firm but melty inside of Lindt chocolate truffle, only…different. Apparently it’s all very hard for me to describe accurately, so it’s probably best if you try it out for yourself.

Second “con” of this recipe: ingredients. If you want these to be superfood chocolate bites, you need to have actual superfoods on hand. And they’re not cheap, either. Organic raw cacao powder, organic dried goji berries, and raw, unfiltered, local honey are all classified as superfoods, meaning they’re chock-full of crazy nutritional power! However, their inexpensive, processed alternatives (baking cocoa powder, dried cranberries, processed honey) are on the opposite end of the superfood spectrum and contain little or no nutritional benefits. I don’t know about you, but I want the power! That’s the whole point of these babies! Coconut oil is irreplaceable, too (and full of health benefits). If you don’t believe me, try using olive oil and you’ll see what I mean.

It’s all pros after that. These will satisfy any chocolate craving and are just bursting with all kinds of amazing nutrients. If you’ve already invested in some of these superfoods and were wondering what to do with them, well, it’s Becky to the rescue! And did I mention that these are super simple to whip up? I think you’ll agree that it feels great to feed your sweet tooth (or chocoholism) with something so wonderfully healthy!

Don’t believe that chocolate can be so incredibly good for you? Check out some the health benefits of raw honey, raw cacao, and goji berries. And though not technically a superfood, cashews are mighty good for you, too!

Let the chocolate-eating commence.

 Goji Cacao Bites

1/3 cup virgin coconut oil
1/3 cup raw cacao powder
2 T raw, local honey
3 T chopped raw cashews (I love them salted for this recipe)
3 T chopped dried goji berries
1/4 t pure vanilla extract
1/8 t pure stevia powder (or more, for added sweetness. If you don’t have stevia, add more honey if it’s not sweet enough for you)
1 T raw coconut butter (optional, keeps it from getting melty longer)
A few cranks of sea salt (optional – a must for me!)

Heat the coconut oil and coconut butter (if using) in the microwave until just melted. Stir in the cacao powder, honey, vanilla, stevia and sea salt until smooth. Pour into some sort of mold – I used an ice cube tray for the first batch and mini cupcake liners for the second (you may notice a lack of cashews in the second batch because, unfortunately, I ran out). I also poured some into a plastic dish shaped like a candy bar and now have a big ol’ chocolate bar in the fridge. Awesome. Sprinkle on the goji berries and cashews, put them in the freezer, and let harden for at least an hour. You now have a week’s worth of healthy chocolate for whenever the craving hits! JOY!

The plan is the get back to our regularly scheduled programming around here. As I mentioned, both Elesha and I have been insanely busy lately, and something very exciting has happened: I got a new job! What’s even more exciting about it is that Elesha is the one who informed me about the job opening and we now both work at the same law firm! It’s awesome to work for the same company, even if we are in different cities. We talk and email constantly and see each other at least once a week – it’s great! We’ll keep you posted on what’s going on behind the scenes. We’re apologize for our absence and hope you’ll stick around – there’s more to come! In the meantime, be healthy and eat your chocolate. 🙂

~ Becky, a skinnyfat girl

Italian Seitan Sausages

If you’ve been hesitant about experimenting with homemade veggie meat thus far, I suggest you take the plunge and give this recipe a try. It’s delicious and you won’t believe how easily and quickly it all comes together. Super simple – great for beginners. And it’s really tough to screw up seitan, so you’re practically guaranteed success. These are spicy, flavorful, and the hubs goes bonkers over them. You’re gonna love ’em, too.

This recipe is taken from Post Punk Kitchen, a great vegan recipe resource. I left out the beans because I didn’t have any cooked, but I’m anxious to add them and amp up the nutritional value. I simply subbed extra vital wheat gluten and nutritional yeast for the beans and it worked perfectly. I also took out the fennel seed because I’m not a fan. These are going to be wrapped in foil and steamed, so you’ll need some sort of steaming apparatus. I have a rice maker/steamer that works really well.

Italian Seitan Sausages
Original recipe found here

Ingredients

1 cup vegetable broth
1 tablespoon olive oil
2 tablespoons soy sauce (I use Bragg’s liquid aminos)
1 1/2 cups vital wheat gluten
1/2 cup nutritional yeast
1 teaspoon garlic powder
1/2 teaspoon red pepper flakes
1 teaspoon paprika
1 teaspoon dried oregano
1/2 teaspoon dried thyme
Several dashes fresh black pepper

Instructions

First, get your steamer ready by bringing the water to a full boil.

Have ready 4 square sheets of tin foil. In a medium bowl, mix dry ingredients together. In another bowl, stir together the broth, olive oil, and soy sauce and mix with the dry ingredients. Divide dough into 4 even parts (an easy way to do this: split the dough in half and then into quarters). Place one part of dough into tin foil and mold into about a 5 inch log.

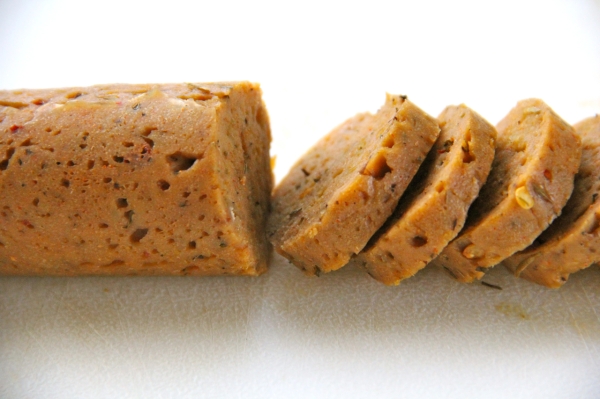
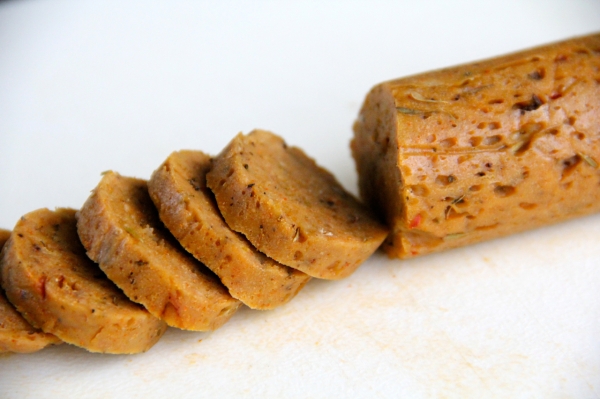
I realize the resemblance to dog vomit here is unmistakable. I won’t deny that (unfortunately, I’ve seen my fair share of the stuff lately). But don’t let that deter you! When they’re done they’ll be perfectly cute sausages. Wrap dough in tin foil, like a tootsie roll.

Place wrapped sausages in steamer and steam for 40 minutes. That’s it! You can unwrap and enjoy immediately or refrigerate until ready to use.

~ Becky, a skinnyfat girl

Get Well Salad

I don’t know about you, but I don’t get sick. Never, not ever. So we’re gonna call whatever I’m experiencing this weekend simply me “feeling under the weather”. That works for me. I will admit to sickness when I’m throwing up, hacking up a lung, or delirious with fever. I’m not any of those things today. Still, it’s really no fun feeling under the weather. I slept ’til 10, woke up, made breakfast, and went back to bed ’til 2. Probably sounds like the average weekend for high school students, but I’m generally up and at ’em at 8 on Sunday morning. Also, my nose is raw and red from wiping all the stuff that won’t stop pouring out of it. TMI maybe, but that’s what’s happening around here. And did I mention my head feels like it’s going to explode at any moment? Yuck.

For dinner, I decided the smartest thing would be to throw all of the healthiest, vitamin-rich, healing foods in my kitchen in a bowl. I have a sneaking suspicion that I’ll feel like superwoman in the morning!

Get Well Salad
Serves 1 under-the-weather person

Ingredients:
2 cups chopped kale
1/2 cup purple cabbage, chopped thin
1/3 cup shredded carrot
1 small granny smith apple, cored and sliced thin
1/4 cup slivered almonds

Dressing:
2 tsp extra-virgin olive oil
2 tsp apple cider vinegar
1 very small clove garlic, crushed
1 tsp minced ginger
1.5 tsp raw local honey
1.5 T freshly squeezed orange juice

Make the dressing first by combining all ingredients. Let it sit for about 10 minutes and strain, discarding the ginger and garlic pulp. Combine all salad ingredients and toss with dressing. Serve immediately.


~ Becky, a skinnyfat girl

Spicy Roasted Potatoes with Collard Greens and Thyme

Although I cook nearly every day, I only use my oven about once a week. Most of our meals are either made on the stovetop, griddle, or aren’t cooked at all. See, the hubs and I are thrifty, and if I’m going to use enough electricity (a.k.a money) to heat my oven for an hour it’s gotta be totally worth it.

Some things that are totally worth it:

Creamy Roasted Tomato Soup.

Chocolate Chip Blondies.

Homemade Focaccia Bread.

Roasted Garlic Parmesan Toast.

And now this.

Potatoes all by their lonesome are one of the tastiest veggies out there, but the addition of sweet potatoes, red onions, greens, fresh herbs, and a kick of spicy serrano take this dish to a whole new level. It really irks me is when people give potatoes a bad rep; a potato is not equal to a french fry in nutritional value! Potatoes are actually a good source of vitamin B6, vitamin C, copper, potassium, manganese, fiber, and also contain phytonutrients that have antioxidant activity. That should shut the potato-haters up!

And don’t even get me started on collard greens…good grief. After king kale, they’re the most nutrient-dense leafy green out there. Just a cup of these bad boys provide you with – wait for it – a whopping 1,045% of your daily value of Vitamin K and 308% of your daily value of Vitamin A. Collard greens actually contain over 80 nutrients! 80!!! I enjoy them in salads and green juice often, but this is the most flavorful way I’ve ever eaten them.

In fact, I’ve been roasting up this recipe at least once a week since I found it. It’s so simple to put together, delicious, nutritious, and filling…yep, all the makings of a great meal! Oh, PLUS – you get to use fresh thyme, which is an added flavor bonus to any meal. Just a winner of a recipe any way you look at it.

Roasted Potatoes with Collards and Thyme
Recipe adapted from My New Roots (one of my top five favorite blogs!)

4 medium red potatoes, diced into 1/2” pieces (leave the skin on) 
2 medium sweet potatoes, peeled and diced into 1/2” pieces 
2 medium red onions, sliced
1/2 bunch of collard greens, stems removed and chopped into small pieces
2 – 3 T olive oil
1-2 tsp minced serrano pepper (optional if you’re not a fan of spicy food)
2 cloves of garlic, pressed or minced
1 tsp minced fresh thyme
Salt and pepper, to taste

1. Heat oven to 400 F.

2. Place diced potato, sweet potato and shallot in a mixing bowl, breaking up the shallot rings just a bit. Toss with oil, sea salt and a couple pinches of ground black pepper. The potatoes should be glistening and evenly coated.

3. Spread evenly on a baking sheet (I like to use parchment paper for easy clean up) and roast for 30 – 40 minutes, tossing once after about 15 minutes.

4. When the potatoes have about 5 minutes left, heat a little butter or olive oil in a large saucepan or skillet over medium-low heat. Add garlic and serrano, if using, and let it cook until fragrant, but not browned, 1-2 minutes.

5. By this time your potatoes should be done. Remove from the oven and add to pan with oil, garlic, and serrano, giving it a quick stir. Throw the collard greens on top, raise heat to medium, and cook, stirring occasionally until greens begins to wilt but are still bright green. Add thyme and let cook 1 minute more. Feel free to add other fresh herbs if you’ve got them. Serve and enjoy!

Vitamin K never tasted soooo good.

~ Becky, a skinnyfat girl

Roasted Garlic Parmesan Toast

This is a post about toast. A toast post.

I realize that you probably think toast is boring. Dry. Crumb-y. Crummy? Heck, I thought the same thing. But this toast is a delicacy! It puts regular old garlic bread to shame. To shame! This is a recipe you’re gonna want to make with every Italian meal you eat from this point forward. And it’s almost too simple to even be called a recipe. It’s more like a suggestion. An inspired idea that I highly recommend. Whatever. Just trust me and make it!

Part of the incredibleness of this toast may be the bread itself. I can’t vouche for other bread, but I’m guessing that your favorite crusty french bread will do just fine if you’re not up for bread baking. But I really hope you are up for it, because there’s nothing more satisfying than slicing into a piping hot loaf of homemade whole wheat bread.

Maybe it’s the comfort of knowing that it contains only five simple ingredients, none of which are additives, preservatives, or processed ingredients. But I think the biggest reason I love baking my own bread is because of what I call ‘the Little House on the Prairie factor’. I like to pretend I’m Ma kneading bread dough in a log cabin with a hot pot of stew over the fire while the girls play with their corn husk dolls.

You do that, too, right? I figured.

I’m fairly certain that everything in the world tastes better when covered in smashed up roasted garlic. Maybe even mustard greens (*shudder*). Still, I think I’ll let you test that one out. I’m sticking with bread for now. Oh, ALSO – if you’re feeling extra experimental, roast some halved cherry tomatoes along with your garlic and pile them on top of the finished product. Let me know how that goes, because I’m almost as obsessed with roasted tomatoes as I am with roasted garlic.

Roasted Garlic Parmesan Toast

Basic Whole Wheat Bread
Adapted from this recipe

Ingredients:
2 cups warm water
1 T yeast
1 T olive oil
1 T honey or agave
2 t salt
5 – 5.5 cups white whole wheat flour (or regular whole wheat)

For the toast you will need:
1 head roasted garlic (or more, 1 head will cover 2 pieces of toast)
Butter or alternative
Olive oil, for drizzling
Parmesan, for sprinkling
Freshly ground black pepper
Sea salt, optional

Instructions:
1. Dissove yeast and honey in warm water in a large bowl; allow yeast to proof (or foam) for about 10 minutes.

2. Add salt, oil, and 3 cups flour; beat for 2 minutes. Then, stir in the remaining 2 cups flour to form a stiff dough.

3. Knead until smooth and elastic; about 10 minutes (this is when you can pretend to be Ma).

4. Place in oiled bowl, turn dough to coat all sides, cover and let rise until doubled.

5. Shape dough into a large loaf and place in an oiled bread pan. Let rise for about a half hour in a warm place – preferably a place your puppy can’t get to! Thankfully, I caught this sneaky girl sniffing before she had a chance to get a taste.

6. Cut diagonal gashes on top of loaf and bake at 375 degrees for about 30 minutes. You can roast the garlic at this time too.

7. To roast the garlic, cut the top off of the head so the raw end of each clove is exposed. Cover the exposed ends in olive oil and wrap the entire head in aluminum foil. Roast for about 45 minutes until completely soft. I like to roast several heads at a time because it disappears quickly!

8. After the garlic has cooled, squeeze all of the soft cloves into a container and mash with a potato masher or a fork until it forms a slightly chunky spread, or longer if you want it to be completely smooth.

9. After the bread has cooled for about 15 – 20 minutes, cut into slices. Turn a frying pan or a griddle on high heat and lightly butter each side of the slice of bread. Grill until each side is crisp and golden.

10. Spread the smashed garlic onto the toast and drizzle lightly with olive oil. Sprinkle with parmesan, pepper, and salt, if desired. Eat slowly and savor every delicious bite.

This recipe came about by chance (or fate) last Sunday after I had baked bread and roasted some garlic for tomato sauce.  In the midst of the hustle and bustle of Sunday cooking I got the munchies and put the toast together on a whim…and was completely blown away. My life will never be the same.

I tend to exaggerate at times. This is not one of those times. You’re looking at life-changing toast.

Roasted, toasted, posted. BOOM.

Oh, one last thing! I can’t feature a picture of my girl puppy without also featuring one of my boy puppy. That would be favoritism. What kind of mother do you think I am?

~ Becky, a skinnyfat girl

A Skinnyfat Birthday!

That’s right, our blog is officially one year old! The time has flown, and it seems like just yesterday we wrote our very first post. But in that short time, we have changed so much. And I mean so, so much.

Fortunately, we still celebrate birthdays with cake. That’s one of those things that should never change.

When we created Skinnyfat, we had an entirely different mindset about food than we do today. Not just food, but life. Elesha and I have both grown so much, it’s almost as if we’re completely new women. It’s been a wonderful experience to share.

Just one year ago, eating was about restriction. It was about always being on a diet. It was about feeling guilty when we ate “bad” food. This blog was basically created because we saw ourselves as “too fat” and we thought we needed some type of food journal, a way to be accountable and “keep us in check”.

But this blog became so much more. The challenge of experimenting with new, healthy recipes created a deep appreciation and respect for simple, whole ingredients and the amazing health benefits that come along with them. Now, food is freedom! Healthy, life-giving whole foods are no longer something we eat because we have to or because we want to lost weight, but because they nourish our bodies, are delicious, and bring us true joy. No bad feelings are associated with food, and certainly no guilt, even when indulging. We have never felt so alive.

So even though Skinnyfat Girls was created in what I now consider a rather negative context, we are both grateful for what it evolved into and the positive effect it has had on our lives. Beyond that, it has positively impacted the lives of our families, friends, coworkers, and many of you faithful readers who have shared our health journey along the way. Thank you all for a wonderful year, and we’re excited for another one full of more great recipes!

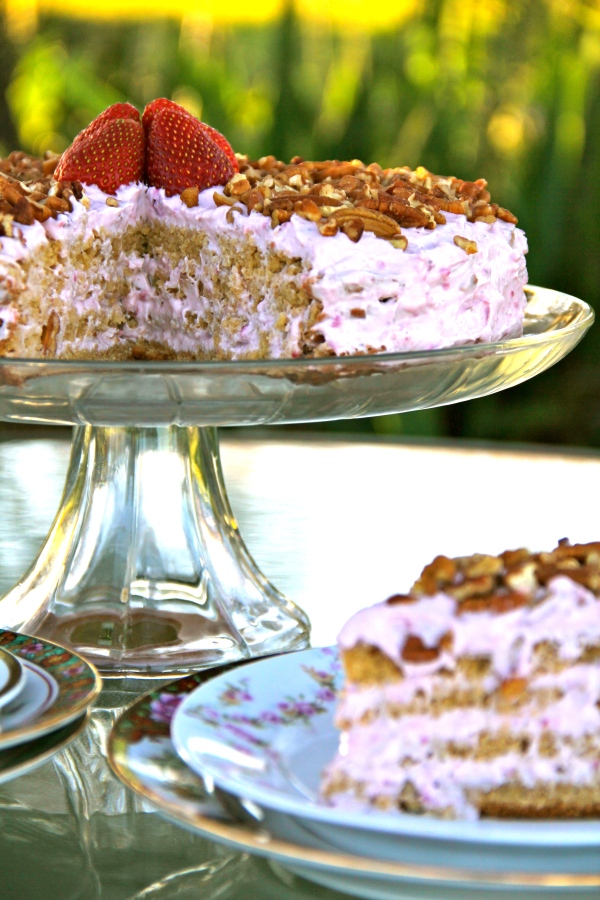
If you’re celebrating a birthday soon, give whole wheat cake a try. It feels great to indulge without all the processed junk. Try subbing out ingredients in your favorite cake recipe: whole wheat flour for white, stevia, agave, and other natural sweeteners for sugar, coconut oil for butter, and so on. I “frosted” this cake with neufchatel cheese, firm silken tofu, banana, strawberries, and stevia all thrown into the food processor until smooth. Light and delicious!

And if you’re intimidated by layers, well, don’t be! It’s easy as pie! Though, I’m not sure the person who coined that phrase ever tried to make a good pie. Good pie is no piece of cake. Aaaaand we’re back to cake. If any of you would like this particular cake recipe, let me know and I will search for it. See, this birthday post was intended to include the recipe until I lost it. Fail.

I promise to be back next time with a brand new recipe for all of you. Until that time, eat cake and celebrate life! 🙂

~ Becky, a skinnyfat girl
Strawberry Avocado Salad

I made you a salad…and by you, I mean me.

And if it’s alright with you, I’m just going to tell you how to make this salad without all the fuss of an actual recipe with measurements. Cool? Cool. Because really, who measures out vegetables for their salad? I can get on board with measuring salad dressing ingredients, but I guarantee you I’m gonna put as much avocado in my salad as I want, regardless of what a recipe calls for. Yeah, probably double what the recipe calls for, because double avocado means I’m double happy, and when I’m double happy, good things happen. Like layer cake. But I’m getting ahead of myself. You’re just gonna have to hold your horses for that one.

So, about this salad: it’s so good. Good enough to fill a giant bowl all for yourself and call it a meal. Good enough to fill an even more giant bowl and bring to a party…but then you’d probably have to share it. That’s not ideal.

Start with a generous pile of arugula. Layer with cucumbers, sliced in thin half moons. Add lots of strawberry slices and as much chopped avocado as your heart desires. Top with chopped pecans and blue cheese (or not, vegans!). For dressing, drizzle with olive oil, balsamic vinegar, and a little bit of agave. You can even crank some freshly ground pepper on there. I sure did. Now dig in! Bask in strawberry avocado bliss.

I should add that I’m showing a rather impressive amount of self control here by not ending this post with a picture of one or both of my puppies. I love them so much…possibly even more than I love this salad. Possibly.

~ Becky, a skinnyfat girl

Recipe for Disaster

Things have been really crazy around here. I haven’t cooked in a while. In fact, all I’ve got left in the fridge are a few bendy carrots and some very questionable grapes.

What’s worse, until last night, I hadn’t slept in about a week. All because I’ve been experimenting with this recipe:

Disaster

Ingredients:
1 hyper puppy
1 chewy puppy

Instructions:
Combine. Voila – disaster!


That’s right, we got puppies!!! Not one, but two. Plural. Double trouble. The gray and white one is our girl Luna, and the tan and white is our boy Piwi. These two have turned our lives upside down! And just so you know, the combination of the two is much more fun, love, and joy than disaster.


These adorable babies have captured our hearts and kept us on our toes; it’s like having a second full-time job! I’ve got a mountain of shoes piling up in my room, a sink full of dirty dishes, and four loads of clean laundry that have been waiting ten days to be folded. Every waking hour has been devoted to picking up after, training, loving, washing, supervising, feeding, comforting, and playing with these little cuties troublemakers.

I am completely and utterly in love. I feel like a mommy now. I promise not to become one of those people who talks about their dogs nonstop, but I can’t promise I won’t throw in a picture of them now and then, because really, look how precious!

I debated about whether or not I should even post today if not sharing a new recipe, but I figured why not share something personal once in a while, right? And I wanted you all to know why I seem to have fallen off the face of the planet! Once things settle down around here I’ll have some great new recipes ready for you, but until that time, enjoy the cuteness!

~ Becky, a skinnyfat girl

Double Chocolate Truffle Muffins

This muffin idea struck me in the brain this morning while I was eating a vegan chocolate truffle for breakfast. I was pondering two equally puzzling questions, first “how could this possibly get any more delicious?”, and second, “how can I convince people it’s acceptable to eat truffles for breakfast?” Turns out muffins was the answer to both.

You see, if you want something to be more delicious, you simply add more chocolate. The amount of deliciousness is equivalent to the amount of chocolate: more chocolate, more delicious. The only thing better than chocolate is chocolate within chocolate. Double chocolate.

I’ve already made Double Chocolate Chunk Cookies. I’m fearful this whole ‘chocolate within chocolate’ idea could get out of control and I’ll wind up with some outrageous dessert called the Quadruple Chocolate Chip Chunk Brownie Cake Pie Mousse Muffin Cupcake Ice Cream Bar. With chocolate sauce. Wow, seriously, that actually sounds crazy good. It’d be like Inception, chocolate style. Once you get to a fourth level of chocolate it’s just complete chaos.

The great thing about these muffins is that they don’t contain butter, white flour, white sugar, or eggs, but you knew that, right? They’re completely vegan and not something you have to feel guilty about eating. While I do consider them dessert, I’d describe them as more bread-like than cake-like, and they’re not overly sweet. The only thing I’ll change when I make these again is that I’ll make them smaller; they were simply massive!

Double Chocolate Truffle Muffins
Makes 12 muffins

1/2 cup warm water
3 T ground flax meal
2/3 cup non-dairy milk
1/2 tsp apple cider vinegar
3 cups whole wheat pastry flour
1/3 cup sucanat (if you don’t have any, substitute with another dry sweetener)
1 t pure stevia powder (I use Stevita)
1/2 cup cocoa powder
1 T + 1 tsp baking powder
1/4 tsp salt
2/3 cup strong coffee
1/2 cup coconut oil, melted
1/2 cup unsweetened applesauce
12 2-inch Vegan Chocolate Truffles (recipe found here)

Instructions:

First, make your truffles but don’t cover them in any toppings. Leave them plain and put them in the freezer to set. Combine the ground flax meal with the warm water, whisk thoroughly, and put in the fridge. Combine the milk and vinegar and let them mingle for a while until they’re good and curdled. Appetizing!

While those set, combine the dry ingredients. Preheat the oven to 350 degrees. Add the hot coffee to the milk and vinegar and whisk furiously for about 30 seconds. Then add the melted coconut oil, vanilla, applesauce, and flax egg mixture and stir vigorously again. Now add the wet mixture to the dry mixture and beat with all your might for as long as your arm will allow, at least 1 – 2 minutes. This allows the batter to aerate and the muffins to rise well.

Spray your muffin pans with oil and scoop some batter into the bottom of each section. Set a truffle in the center and cover with batter.

Truffles covered in chocolate batter…yeah, it’s up to you whether or not you want to keep going at this point. I mean, I could honestly call it a day and be in heaven just eating this stuff with a spoon. Batter lovers, unite! Bakers, keep reading.

Put your muffins in the oven and let them bake for about 35 minutes. Oh my, look how puffy! And all without eggs. It’s a miracle!

I liked that cute one with the mohawk. However, I promptly gave him a haircut…with my teeth.

Let them cool for about 10 minutes, then top with whipped or coconut cream while the muffins are still warm so everything gets all melty and drippy and delicious. Sprinkle with some more cocoa powder for ultimate truffliness (I realize I’ve been creating words left and right; clearly, it’s one of my many gifts). Good grief, just look at them. You know you wanna slurp that up. I certainly did and was just the right amount of sticky and happy when the photo shoot was over. Then I sliced one of those bad boys open and poured hot coffee on it. It was a great idea. Apparently today is a great day for ideas.

Oh, gooey truffle center, you make my heart all a-flutter. I’m now certain that truffles were made to go inside muffins, we just never knew it until now. You’re welcome.

~ Becky, a skinnyfat girl

Vegan Chocolate Truffles

I’m a girl who worships chocolate, enjoys fancy dinners, and is head-over-heels in love. Funny thing is, I couldn’t care less about Valentine’s Day.
No, really!

When I want chocolate, I eat it. When I want a fancy dinner, I make it. And when I want to celebrate love, well…I do. Every day of my life is a celebration of love in one way or another.

However, this Valentine’s Day is different. Special. Because this year I have a new love: you! That’s right, I wanted to make you guys something really special this year to show you how much I appreciate you as readers. Something chocolate. And creamy.

Fine, I’m totally lying. It sounded nice and everything, but who am I kidding? This is my Valentine’s Day gift to me! Sure, you guys get a recipe, but it’s really only a couple of pictures and words on a page; I’m the one with truffles in my freezer! Twelve of them, to be exact (originally 14), and I’m going to eat every single one all by myself. The hubs will never know they’re in there. In his experience, the freezer only holds boring things like vegetable stock and edamame beans. He’s got no need for those things, meaning he won’t open the freezer, meaning these smooth, silky, chocolately, melt-in-your-mouth truffles are all mine!

I love Valentine’s Day.

Vegan Chocolate Truffles
Makes 12 – 14 2-inch truffles

4 squares (4 ounces) unsweetened baker’s chocolate
The thick top half of a can of full-fat coconut milk
3 T agave (or more if desired)
1/2 t vanilla
1 T coconut oil
Few grinds of sea salt, to tase
Shredded coconut/chopped nuts/cocoa powder

Important Note: Only use full-fat canned coconut milk that has been sitting, unmoved, untouched, and unshaken for several days. I recommend a week or so. I had great results with this recipe, but two friends both ended up with super melty chocolate that never hardened. The difference was that they had just bought theirs, while mine had been sitting in the cabinet for 2 weeks! This time allows the thick cream to separate from thin milk. When adding the cream to the recipe, scoop it out of the can, do NOT pour (you don’t want to mix in any of the thin milk).

Other note: You can use 4 ounces of semi-sweet or 60% chocolate chips, though the chocolate flavor will not be as intense as the unsweetened baking squares and there will also be added sugar, so keep that in mind. As written, the chocolate taste is quite strong, so if you’re not a fan of strong chocolate you may even want to use milk chocolate.

1. Melt the chocolate squares in a pan on the stovetop on very low heat. When the chocolate is completely melted, scoop out the top half of the can of coconut milk into the pan and stir gently until completely mixed.

2. Add the agave, vanilla, coconut oil, and salt and stir thoroughly. Continue to stir over low heat until completely smooth. Scrape the chocolate into a bowl and put in the freezer for 3o minutes.

3. Remove the chocolate from the freezer – it will be hard enough to form into a ball and soft enough to, well, form into a ball! If you leave it out for too long it may start to stick to your hands, in which case you can put it back in the freezer for a few minutes. Form the chocolate into balls, approximately 2 inches in diameter.

 4. Fill a bowl with shredded coconut, nuts, or cocoa powder. Roll the balls of chocolate in the coconut or other toppings until completely covered.

You’re done! Store the truffles in the freezer – I promise they will stay soft and creamy! And despite all of the coconut ingredients, the chocolate itselft has no coconut flavor whatsoever, so you can cover your truffles with whatever toppings you like. I chose shredded coconut because a. I’m an addict, and b. that’s pretty much all I had in the house.

Enjoy an intense chocolate experience! You may even feel generous enough to share these with a loved one. I definitely encourage the truffle-sharing; these are made with whole, healthy ingredients but they SHO AIN’T low calorie. Indulge in one or two but don’t get carried away. I am all about love on Valentines Day, but not love handles.

Have a great holiday, folks! Don’t forget to share the love!

~ Becky, a skinnyfat girl