Juicing 101

Raw power.

I’ve blogged casually about juicing, but I think it’s time for me to get serious. If you don’t have a juicer, well, you should. I’ve seen some decent ones on amazon for as low as $65, but if you’re able to make a bigger investment, it’s totally worth it!

While I’m making suggestions, I may as well add that you ought to take some time to watch the following documentaries: Fat, Sick, and Nearly Dead, Food Matters, and the Gerson Miracle. They will change your life; at least, they changed mine. No, I’ve never been seriously overweight or sick before, but watching those films has drastically altered the way I eat and think about food, which will ultimately affect my lifelong health and longevity, not to mention the health habits of my future children. These documentaries also gave me a greater respect for the power of fruits and vegetables. Nature is truly incredible.

Ideally, everyone should start off the day with fresh green juice. It is a super-concentrated, unique source of vitamins and nutrients that your body needs on a daily basis. Most of us are deficient in some way, whether we realize it or not, and drinking a cup of green juice is the perfect and natural way to give your body the vitamins it’s lacking. You’ll find that when your body is equipped with the vitamins and nutrients it requires to function correctly, it is next to impossible to become sick. Fresh juice has magnificent healing properties and a faithful juice fast can cure numerous ailments.

I’m a big fan of eating lots of raw fruits and vegetables on a daily basis, but it’s not everybody’s thing. For those of you who have trouble consuming the 8 – 9 recommended servings per day, juicing is a quick way to get those servings without all the chewing. It would take a good hour for me to eat all the stuff I put in my morning juice; it’s much more convenient to drink it within a matter of seconds.

The beautiful thing about juicing is that you can put practically anything through there and it will taste great…as long as you add a piece of fruit! I still can’t stomach pure green juice that doesn’t at least have a bit of apple, beet, or carrot to sweeten it. Some quick rules of thumb:

1. Always juice greens. It just doesn’t make sense to go to the trouble of juicing and not throw some greens in there. Unless you put like 4 heads of collard greens in one juice, you won’t really notice much difference in the flavor, but you’re adding tons of nutritional content. Don’t be scared, just do it.

2. Always juice celery, even if it’s just half a stalk. It helps to deliver the nutrients to your tissue.

3. Because of its high water content and mild flavor, add cucumber when juicing vegetables with strong flavors (such as the collard greens I was talking about).

4. Drink your juice right away. It starts to lose nutrients immediately, so gulp that baby down as soon as possible!

If you’re hesitant to juice random combinations of produce, here are a few “recipes”, if you will, that I use often. Remember to always wash everything very thoroughly and chop to the correct size for your juicer’s chute. A helpful hint: greens are sometimes difficult to juice, so always juice them by handfuls along with something large and dense, like a quarter of an apple, beet, carrot, and celery. If you fill the entire chute with kale, you’re likely to have issues. Oh, and don’t forget to stir!

Morning Glory
Makes 2 large servings
You can substitute any dark greens for kale. I personally like the flavor of kale and it has the greatest nutrient density.

6 cups kale, spines removed (optional; they can be bitter)
4 celery stalks
4 medium carrots
Half of one large cucumber
Half of one large beet
2 Granny Smith apples (nice and tart, but you can use any apples)
Lemon or lime, to taste

Green Explosion (ingredients shown above, photo of the juice seen at the top of this post)
Makes 2 large servings

6 cups kale
3 cups spinach
4 stalks celery
2 apples
Half of one large cucumber
Fresh basil, to taste
Fresh mint, to taste
Handful of wheatgrass

Note: One ounce of wheatgrass has the equivalent of 2.5 cups of green vegetables in nutritional value. The Green Explosion is quite a mighty elixir!

Pineapple Citrus Blast
Makes 2 servings

Half of one pineapple, peeled
1 large grapefruit, peeled
2 medium oranges, peeled
1 large apple
3 cups turnip greens (or greens of choice)
Fresh mint, to taste
Lemon or lime, to taste

There you have it, a few of the juices I enjoy regularly. I hope you enjoy them, too! I am currently nearing the end of day three of a five-day juice fast. I am doing this to clean out the junk my body has built up over the holidays and past month, which has come to my attention by way of bad skin and a couple of pounds. When my body is thoroughly cleansed, I look forward to maintaining my squeaky-clean innards with lots of great new recipes that I can’t wait to share with all of you!

Happy Juicing!

~ Becky, a skinnyfat girl

Crunchy Pecan Granola

Happy New Year! I hope you all enjoyed the holidays as much as I did. I’ve definitely got a bad case of the after-Christmas blues, especially after taking down my tree today. Well, technically I just moved it, fully lit and decorated, out of the living room and into the second bathroom that we never EVER use. Why spend hours taking a tree apart and putting it back together? When Christmas rolls around again, decorating will be a cinch! I think it’s a brilliant plan. Plus, if ever I’m in a bad mood I can simply draw up a hot bath in the old bathroom, plug in the tree, and listen to “Baby, It’s Cold Outside”. It’ll be Christmas all year round in there!

Has everyone made their resolutions? I have quite a few, so I’ll just share a couple of them. More than anything, I want to continue to live a healthy lifestyle and be more committed to nutrition and daily exercise. Some others: Learn to drive stick. Develop lots of new recipes. Learn how to use my camera. Practice calligraphy. Learn to sew. Figure out what I’m going to do with the rest of my life. Blog more. Buy a bicycle. Oh yes, and stop hanging every darn thing on the refrigerator! It’s getting ridiculous.

Oh, and lastly, eat more waffles. My mom got me a Belgian waffle maker for Christmas, so look out; I’ve already named 2012 ‘The Year of the Waffle’. We’ve had them for breakfast twice already this year and it’s only January 2. I would hate for the world to end and have the regret of not eating enough waffles. I promise to post my recipe once I perfect it. Yesterday’s waffles weren’t so great, but today’s….mmm boy! They’re whole wheat, vegan, and use soy milk curdled with apple cider vinegar! Doesn’t that sound tasty? 😉

Now, about this granola: it’s without a doubt the best granola I’ve ever tasted. I gave it to some friends for Christmas and they all loved it, too. My husband says we could sell the stuff. I got the recipe from one of my dearest friends, who got it from her sister, who adapted it from a recipe she found…somewhere. The only trouble I see with it is that some of the ingredients, namely the coconut oil, pecans, and coconut palm sugar, are rather expensive and may not be something you have on hand or want to splurge on. While I do suggest sticking to the recipe if possible (because it’s perfection), you can make substitutions if necessary: other nuts of your choice for the pecans, butter, a butter alternative, or canola oil for the coconut oil, and a darker sweetener (such as brown sugar or sucanat) for the coconut palm sugar. Also note that the wheat germ can be omitted if you don’t have any, and oat bran is easily made by blending rolled oats into a coarse flour in a coffee grinder or food processor.

Crunchy Pecan Granola

Ingredients:
6 cups rolled oats
1 cup pecans, chopped
1/3 cup coconut palm sugar
1/2 cup white whole wheat flour
1/4 cup wheat germ
1/4 cup oat bran
1/4 cup ground flax meal
1/2 cup unsweetened coconut flakes (optional, I love them!)
1 t salt
1 t cinnamon
1 cup coconut oil
1/2 cup molasses, honey, or agave

Instructions:

1. Preheat oven to 325 degrees. Mix the dry ingredients together.

 2. Whisk the oil and molasses together and add to the oat mixture. Mix well.

3. Divide the oat mixture onto two baking sheets and spread evenly. Bake for 20 – 25 minutes, stirring all the way down to the bottom of the pan every 10 minutes or so. Bake longer if you prefer darker, crunchier granola. Let cool and serve.

Granola is one of my favorite things to eat for breakfast (besides waffles). I especially love it with Greek yogurt and chopped fruit for a delicious and healthy breakfast parfait. If eating healthy is one of your resolutions this year, make sure to eat breakfast; it’s the most important meal of the day!

I topped this parfait with banana, shredded coconut, and homemade blackberry sauce. What tasty additions do you put on your parfait?

~ Becky, a skinnyfat girl

Accidental Genius

Red velvet pancakes.  They sound brilliant, right?  I certainly thought they would be a good idea.  Of course, it would be completely un-skinnyfat of me to use food coloring, so I decided to use beets.  Now from the internet research I did, it seemed like using beets to make red velvet cake is pretty much a hit or miss, with more people missing than hitting.  I figured I’d still give it a shot.

Yeah, my red velvet pancakes were not so red and not so pretty. 

However, my complete failure at producing beautiful, naturally scarlet pancakes, were a near stroke of genius.  These pancakes were so soft, so fluffy, so delicious.  I knew I was on to something.  My next version of the pancakes were, in a word, divine.

Oh, So Fluffy Pancakes (No Buttermilk Needed)

  • 1 cup whole wheat pastry flour
  • 1 teaspoon baking powder
  • 1/2 teaspoon baking soda
  • 1/2 teaspoon salt
  • 2 teaspoons stevia (or 1 packet)
  • 3/4 cup canned coconut milk
  • 1 tablespoon vinegar (I used pomegranate vinegar)
  • 1 tablespoon butter or healthy substitute
  • 1 small yellow squash, chopped or sliced

To begin with, mix all of the dry ingredients in a bowl. 

Check out my humongous bag of whole wheat pastry flour!  It’s so big, the laundry room is the only place it fits in my apartment.  I love Amazon! 

Okay, ignore my rant and keep mixing the dry ingredients.

Then slice the squash.

Blend the squash along with the butter, milk, and vinegar.

Mix wet and dry ingredients together.

Preheat your frying pan to medium heat.  Once the pan is heated, then you can pour and form your pancakes on the pan.  I always like to transfer my pancake batter into my liquid measuring cup or blender, it helps me to pour the batter more easily. 

Your pancakes should be ready to flip when they get fluffy and bubbly, like this:

See how pretty?

I used pumpkin puree, cinnamon, peanut butter, and maple syrup to make the perfect pancake stack.

The cream at the top is coconut whipped cream.  You can find Katie’s version of it here

I had these pancakes for lunch  the past two days.  Yes, I have no shame in eating pancakes for lunch.  If it’s good for breakfast, it’s also good for lunch and supper.  I think I have my new mantra. 

Until next time, try pancakes for lunch.

~Elesha, a skinnyfat girl

Zucchini (and Friends) Bread

Now that it’s fall, I go weak in the knees for all things baked. So when I came across this easy (and adorably written) recipe, I knew I had found a quick cure for my bread craving.

After devouring a thick slice with melty butter (Smart Balance, really), I was satisfied…momentarily. I wanted more bread, but not the simple, yeasty bread I’d just baked. I wanted dense, sweet, gooey bread. Zucchini bread.

The recipe I used was really just a guideline. You won’t believe the nutritious goodies I’ve added! Besides zucchini, this bread will fuel you with banana, flax seed, applesauce, coconut, walnuts, and wheatgrass. Yes, wheatgrass.

Poor wheatgrass. It ain’t easy being green. One of the superest of superfoods, hardly eaten by the average American. And even then, it’s usually only consumed in green juice or powdered capsule form. Why are we such grass haters? Grass has rights, too. Give grass a chance.

I realize I sound like a hippy, but I promise I’m still talking about wheatgrass.

I saw a small bottle of wheatgrass capsules in the store last week for $28.99. No, no, no! It was all wrong! Instead, I bought a container of the fresh stuff in my local health food store for $1.89. Better, right? The fresh stuff has more of the good stuff in it, anyway. I think the reason people don’t buy wheatgrass is because they think “You want me to eat grass? Ew! Nasty!”. Well, think again, people, because this recipe allows you to reap the health benefits of wheatgrass and not even realize you’re eating it. No more excuses!

Zucchini (and Friends) Bread
Adapted from this recipe

Ingredients:

3 cups flour (I used half white whole wheat, half whole wheat pastry)
2 t cinnamon
1.5 t baking soda
1/2 t baking powder
1 t salt
1/4 cup ground flax
1/4 cup finely chopped wheatgrass
1/2 cup applesauce
1/3 cup coconut meal (I have lots left from making milk)
1 very ripe mashed banana
1/2 cup milk of choice (I used coconut)
1/2 cup canola oil (or oil of your choice)
2 t vanilla
1/2 cup raw sugar (or other dry sweetener, or 1/4 cup stevia)
2 T agave (or other liquid sweetener)
1 cup shredded zucchini
1/3 cup chopped walnuts

NOTE: I realize you may not have every single one of these ingredients on hand. No worries, you can omit the wheatgrass, applesauce, coconut meal, banana, or walnuts if you don’t have them. You can even substitute other nutrient-dense foods in their place: carrots, squash, oats – get creative!

Step 1: Preheat the oven to 350. Combine the dry ingredients (the first six) in a large bowl.

Step 2: Mix the rest of the ingredients except for the zucchini and walnuts in a separate bowl. When mixed thoroughly, add the zucchini and walnuts.

Step 3: Add the wet mixture to the dry and mix thoroughly.

Oh YUM - look at the green bits!

 Step 4: Scoop mixture into a well-oiled bread pan.

Step 5:  Try not to eat too much of the delicious batter. I failed miserably at this step.

Step 6: Let bake for 1 hour or until you can put a butterknife in the center and it comes out clean. Let it cool. When I cut a slice a few minutes after taking the loaf out of the oven, it just fell apart. It tasted wonderful but it was just crumbs. I was devastated and thought I’d have to start all over. NOT THE CASE! 2 hours later I wanted another piece and it had magically bound together! Let it cool. Still, it’s very soft, so be sure to cut through it carefully so it doesn’t fall apart.

Pretty simple, right? The only hard part is all the waiting, but I promise you – it’s well worth it!

Hopefully all this bread will silence the baking monster within me for a few days. After that, I’ve got a couple cans of pumpkin in the cabinet begging to be put into Elesha’s pumpkin bar recipe, a pie, or maybe even brownies.

Fall is the best.

~Becky, a skinnyfatgirl

Jicama Pear Salad with Orange Vinaigrette

Step aside, boring sandwich and Diet Coke, because lunch at the office just got a whole lot more interesting.

No, you’re not in a pricey restaurant, you’re in the break room. This salad may sound fancy, but it’s really quite simple to put together, chock full of nutrients, and, best of all, entirely scrumptious!

I know what you’re thinking: those are some GIANT raspberries. Yup. Gigantic, delicious raspberries that were on sale, 4 cartons for 5 bucks! Definitely the best $10 investment I’ve made in a while. I didn’t initially plan to put them in my salad, but it turns out they add a necessary tartness.

I don’t know about you, but I’ve had enough of this heat and am really quite ecstatic about not having to put my head in the freezer anymore! And I’m sure my sad lawn will be grateful for a break from the unrelenting sun after being scorched for three months straight.

We have a tiny, random green spot in the yard. We call him "Patchy". We haven't had to mow since the first week of June because SUMMER IS A MURDERER.

This will be the last hoorah for summer recipes of the year, though I can’t promise that I’ll stop drinking strawberry coconut smoothies anytime soon. This salad is light and fresh – a great way to celebrate the last week of summer.

Jicama Pear Salad with Orange Vinaigrette
Serves 4 (or, ya know, just me)

Ingredients:
1 medium pear, sliced
1/3 cup jicama, peeled and chopped
1/3 cup toasted pecans (I only had raw almonds, but they tasted great, too)
1/4 cup raspberries, chopped
3 cups chopped Romaine lettuce
3 cups chopped dark, leafy greens (kale, chard, spinach; I used collard greens)
Optional: If you eat dairy products, goat cheese would be a wonderful addition!

For the dressing, combine the following ingredients and mix well:
1/4 cup freshly squeezed orange juice
1.5 T white vinegar
1 T agave (optional)
1 T olive oil (optional, I omitted)


Chop all of your ingredients. For collard greens, kale, and swiss chard, it’s preferable to remove the bitter spines from the leaves.

Toss the greens with the vinaigrette. Because it’s strong, you may not need to use all of the dressing, so add half, taste, and go from there. Divide onto four salad plates and garnish with all additional ingredients. Serve immediately.

What’s special about this salad is that it has so many different things going on at once. The citrusy vinaigrette brightens up the strong, dark flavor of the greens, jicama adds an earthy, root flavor, raspberries provides tartness, the pear is sweet and fruity, and pecans finish it off with a nutty crunch. I imagine goat cheese would add a lovely creaminess.

Of course, I have to mention that the fact that fresh, raw green leafy vegetables contain high doses of chlorophyll, easily digestible proteins, enzymes, and a wide range of vitamins and minerals. They’re an easily accessible superfood that should be eaten daily. Berries are among the fruits highest in antioxidant content and are excellent sources of several phytochemicals that seem to help block cancer development. Additionally, nuts, pears, oranges, and jicama offer other health benefits. Your body will LOVE this super salad!

Powerful and tasty all at once? That’s why I eat four servings.

~Becky, a salad freak skinnyfat girl

Strawberry Scones

When I was 18 I worked at my aunt’s coffeeshop. I consider it one of my favorite jobs ever, which is saying something, seeing as how I’ve already had over 10 jobs in my 24 years.  The Moonstruck Cafe; I have such fond memories of that place.


It was just barely big enough for the counter and a few small tables, but it had plenty of faithful customers. Everything was decorated in suns and moons, and my aunt had stenciled hundreds of hand-painted gold stars over the midnight blue walls. Ecclectic paintings hung for sale by local artists and hometown bands would come in and play live music on Friday nights.

Whether it was The Talking Heads or Duke Ellington or an old 80’s mix playing overhead, the musical selections were unpredictable and yet somehow always just right. The atmosphere was laid back and everybody knew each other. It was fun to see the regulars pull up – Teacher Tim, Steve the Green Tea Guy – and have their drinks ready by the time they reached the counter. It was cozy. It was home.

But my favorite thing of all was the scones. Blueberry scones. Selling that last scone was the happiest moment of the week, because I knew that in less than an hour I would take a fresh batch from the oven and escape into a rich, warm, blueberry scone heaven. Yes, being the owner’s niece had its perks. Free coffee was great, but nothing compared to free scones.

Before I knew it, we had moved out of state and my coffeeshop days were over…and I haven’t had a scone that good since. With that realization, I made it my mission to recreate scone bliss, only this time a healthy version. A daunting task; scones are all cream, butter, sugar, and white flour. But I’ve done my best, combined multiple recipes, and present to you my best attempt at a very nutritious and delicious scone.

Warning: turn back now if you like crumbly (DRY) scones like the ones you find in most coffeeshops. These scones are moist. Not dense, moist – because there’s nothing I hate worse than a mouthful of dry crumbs. Oh, and for the record, these taste nothing like the blueberry scones from Moonstruck. Completely different flavors, but even more satisfying. Trust me, I tested these on a number of people who are not fans of typical health food. Even my brother, whose favorite food in all the world comes from Taco Bell, came back for seconds and told me repeatedly how good they were.

Another great thing about this recipe is that you can use whatever berries are in your fridge. These can just as easily become blueberry scones, raspberry scones, or boysenberry scones! I just happened to have strawberries on hand, but you can bet my next batch will be blueberry.

One last thing: you’re going to be adding some vegetables. Beets and carrots, to be exact…because that’s just what we do around here. Don’t get me started about beets. Poor, underrated root! To be brief: Don’t want cancer? Eat your beets. 

Let the scone-making begin.

Skinnyfat Strawberry Scones

Ingredients:
2 cups whole wheat pastry flour
1 T baking powder
1/4 t baking soda
1/4 t salt
1 T Stevia (or sweeten to taste with your favorite sweetener)
1/4 cup cold butter or substitute (I used Smart Balance)
1/4 cup oil (healthy variety; I used coconut)
3/4 cup milk (the thicker the better. I use 1/2 cup almond milk, 1/4 cup coconut cream. Creamier means richer, moister scones)
1/4 cup finely shredded beets
1/4 cup finely shredded carrots
1 cup fresh strawberries (or berries of choice)

Step 1: Preheat the oven to 400. Combine your dry ingredients (flour, baking powder and soda, salt, and Stevia) in a bowl.

Step 2: Add the wet ingredients (butter, oil, milk, and cream, if using) to the dry ingredients. Cut in with a fork or pastry cutter until just combined.

Step 3: Shred the beets and carrots onto a paper towel. Press until most of the juice is gone and you have semi-dry vegetable shreds. You’ll go through a couple of paper towels.

Step 4: Add the berries, beets, and carrots and mix until just combined.

Step 5: Shape the dough into a round, very thick pizza shape on a cookie sheet (think deep dish pizza, only deeper!). It should be about 2 – 3 inches deep. Cut into 8 equal parts and separate the pieces about an inch apart so they have room to expand while cooking.

Step 6: Bake for 17 – 20 minutes. Remove from oven and let cool. You can drizzle agave on top or add a glaze, which can be made by whisking together a bit of melted butter, sweetener, and vanilla. Serve with butter or jam, or devour them plain like I do. Scrumptious any way you look at it!

So grab a cup of hot coffee, that book you’ve been wanting to read, and savor a warm scone (or two). The best part? Now there’s no scone guilt, because – let’s face it – most scones are just a dense cake that managed to weasel it’s way into the breakfast food category. Enjoy the satisfaction of eating baked goods that are actually that: good for you. “Baked good-for-yous”, if you will. 🙂

~Becky, a skinnyfat girl

Bagels = Joy and antioxidants

Okay, so you know how in this post I said that pastelillos de guayaba (guava pastries) would be my next recipe attempt?  Well, I lied.  Don’t ask me why I have not yet gotten around to using the enormous stack of guava paste that I ordered in bulk from Amazon. 

In my defense, I did not realize how much guava paste I would be getting when I ordered it.  Now I will definitely get to making pastelillos de guayaba at some point, but now is not that time.  

By now you must know how much Becky and I love to add funky things to our recipes to make them more nutritious .  You can take a look at pretty much any of our recipes and see examples of this (“Greens with Ice Cream” Shake  and Chocolate Chip Blondies  are just a few).  I’ve applied this tactic with a vengeance to another food item I love, bagels

If bagels are one of the foods you’re scared to eat because they are unhealthy, fear no more.  I have rescued and remade your nutritionally void loop of unhealthy carbs into a fiberful treat for both you and your body to rejoice over. 

Here it is:

  • 4 cups whole wheat flour
  • 1.5 teaspoons salt
  • 2 tablespoons oil or butter
  • 2 teaspoons yeast
  • 1.5 cups water
  • 1 cup shredded carrots (yes)
  • 1.5 cups chopped kale (and yes, seriously)

Blend all ingredients except for yeast and flour in the blender.  Once the carrots and kale have blended in well, heat the mixture in the microwave until warm.  Then mix the flour, yeast, and liquid together in a mixing bowl.  Oil your hands and knead dough, then separate into 12 equal parts.  Let the dough rest for about 10 minutes.  While the dough rests, bring a large pot of water to a boil and preheat your oven to 425.

Once you have let the dough rest, form each section into bagels.  I found the best way to do this is to roll each section into a hamburger bun shape and then use your finger to make the bagel hole.   Once the bagels are formed, boil each bagel for about a minute on each side.  This will make them puffy and nicely shaped. 

Once boiled take bagels out and put on an oiled cookie sheet.  At this point you can dip the bagels in seeds or nuts, if you want.  I didn’t, but if I had some whole flax seeds, I may have tried.  Bake at 425 for about 5-10 minutes, then flip them and bake them for 5-10 minutes more. 

For a healthier version of cream cheese, try using greek yogurt or neufchatel cheese.  I had one with neufchatel cheese and guava paste (hey, I had to start using it somehow) and then I had another with melted cheddar cheese.  Yes, I had to have two, they were just that good!  And tomorrow, I have a sneaky suspicion I will be having a egg and cheese bagel for breakfast.

Have another favorite type of bagel?  Try your own variations of bagels and let us know how they turn out!  We love to learn new tricks!  Don’t forget like us on Facebook and follow us on Twitter!  And if you love us, help us spread the word! 

~Elesha, a skinnyfat girl

Vegan “Fast Food” and Gelato

E – After weeks and weeks of pining and tear-shedding, Becky and I finally had a proper girls outing.  Now, of course, the word “proper” in our vocabulary absolutely and unequivocally means that food will be involved.  This trip we decided to try Loving Hut Vegan Cuisine.

B – This place was quaint, but actually left something to be desired. We both got wraps, which were good, but nothing special. We agreed that we could have made something more delicious at home. We’ll probably do that next time! Still, the seitan was tasty and inspired us to work on our own gluten recipes. We each had a side of potato salad that definitely did NOT taste vegan. Again, it was good, but I’m not a huge potato salad fan and wasn’t crazy over it.

E – After the slightly underwhelming lunch, we made our way over the mall and had gelato at Paciugo!  The great thing about Paciugo’s is that the gelato has 70% less fat than regular ice cream because they don’t use cream.  They also have fruit sorbet and vegan options available, but Becky and I weren’t quite so good and went for the real deal.  Everything is made fresh daily with fresh, real ingredients, and you can really tast the difference.  Once you go Paciugo, you will never go back.  Okay, so that was cheesy, but it’s still the truth.

B – While gelato is not healthy by stretch of the imagination, it is still healthier than ice cream.  The Hazelnut Mocha completely reversed any dissatisfaction caused by lunch. We were both silently immersed in our own little gelato worlds for at least five full minutes, which is saying something because we usually can’t shut up.

We took a bunch of regular pics, but I think this one sums up our real feelings.
E – While gelato nearly always makes for a number one moment of any day, I have to say that the very best part of the day was having some good quality togetherness.  Next time we will try to cook something fabulous and share it with all of you!
~Becky and Elesha, skinnyfat girls

Holiest Guacamole with Totopos

I’ve wanted to do a guacamole post for months. Months. I’ve made it plenty of times in those months but never have the patience to take pictures. I simply don’t have the self control to stop myself from eating it the moment it’s ready! Guacamole is one of my favorite meals ever, ever, EVER. Yes, it’s a whole meal; the hubs and I quite regularly devour a giant bowl of it with totopos, which are simply corn tortillas cut into quarters and baked until crispy. Like tortillas chips, only without all the oil and salt. They’re also much thicker than chips, which make them stronger, more capable guacamole shovels.

Avocado almost melts on the tongue. Smooth, flavorful, and buttery, a plant can’t possibly get much better, in my opinion. But besides tasting absolutely divine, it also offers an array of health benefits. Unfortunately, it has come to my attention that people actually avoid avocados. I had a coworker come back from his lunchbreak and tell me, in hushed tones, that he had seen another coworker order guacamole on her chicken sandwich, and did I know how fattening guacamole is? I tried not to laugh out loud.

The avocado is, indeed, comprised mostly of fat, but it’s NOT fattening. The human body needs fat to function properly, but there are good and bad fat choices. I won’t go into a whole spiel here, so if you’d like to read more on why good fats are critical to a healthy diet, click here, here, here, or google “healthy fats” for a plethora of information on the topic. Some good sources of healthy fats include nuts, olive oil, fatty fish, and – you guessed it – avocado. So please, please, eat avocado at every opportunity, and most preferably in guacamole form.

Guacamole is entirely customizable. Some people like it smooth and creamy, others chunky. Some like it mild, others spicy. It’s taken me a few years to perfect it to my taste, but you should most definitely take your own preferences into consideration. If you’re not big on cilantro you will hate my guacamole, but you’re not making it for me, are you? Omit the cilantro, just never tell me about it because I will cry.

Holiest Guacamole

Ingredients:
(amounts are approximate)

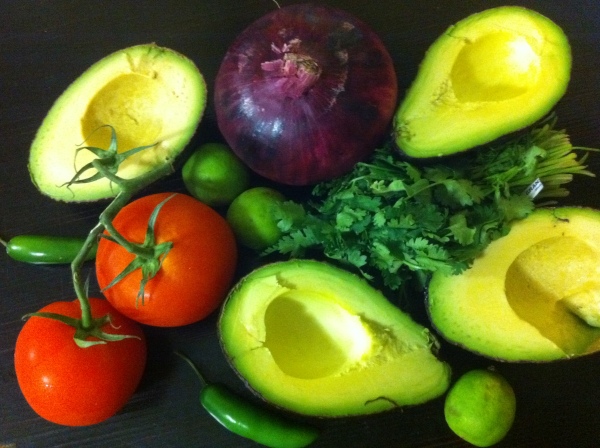
2 large avocados
1 medium tomato, chopped
2 – 3 serrano peppers, seeds removed and finely diced
1/4 – 1/3 cup fresh cilantro, chopped
1/8 – 1/4 cup red onion, finely diced
Lime
Salt and pepper to taste

Is that not a beautiful list of ingredients? Simple, fresh, and healthy.

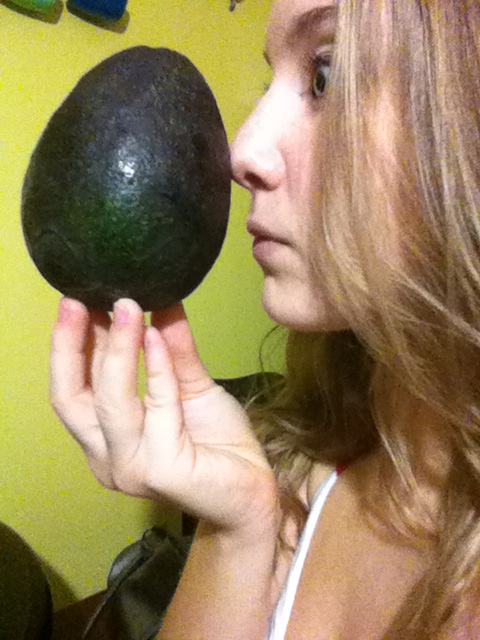
Of course, the avocado is the most crucial. Invest in the best ones you can find; guacamole deserves it. I generally look for avocados the size of my face.


Before you get started, cut your corn tortillas into quarters, spread out on a cookie sheet, and put in an oven preheated to 350. Let those bake while you prepare your guacamole and they should be nice and crispy when you’re done.

First, chop the tomatoes, onion, serranos, and cilantro.

Scoop the avocado into a bowl and mash to your heart’s content. I like some chunks in there, especially because it tends to smooth out a lot when you mix it all together.

Add your chopped ingredients to the avocado and squeeze fresh lime juice on top. Add salt and pepper to taste. I like freshly ground sea salt and black peppercorn. Adjust flavors as desired.

Take your crispy totopos out of the oven and scoop the avocado perfection into your mouth. Repeat. Repeat. Repeat. Seriously, don’t stop.


It seems almost unfair for something so easy to make to taste so insanely good. Shouldn’t I have to work a little harder to produce something so fabulous? Nope, guess not.

Make it, see for yourself. Don’t forget the cilantro.

~Becky, a skinnyfat girl

Throwback and cake…

Okay, so I was going through some pictures and I just happened upon my “Becky & Elesha” file.  I couldn’t resist, so here is a snapshot of Becky and I throughout our marvelous friendship.

The beginnings (2006)

We love Christmas and hats (2007 )

Always being silly (2008)

With my favorite blonde (2009)

Yes, we love each other (2010)

Becky and I share a lot of loves, but today I’m going to focus on one in particular: coffee.  Oh, the joy of coffee – the aroma, its bittersweet perfection, the joy of sharing conversation over a cup of it.  I must admit that I enjoy a small cup of espresso almost every morning, as part of a balanced diet, of course.  The other day, I met a lady who was 94-years-old and in awesome shape.  She was hanging out at the pool in 100 degree Texas weather and walking around cracking jokes, laughing.  It was amazing!  I’ve seen 70-year-olds who look older than she did!  My hubby asked her what her secret is and she answered “I drink coffee everyday”.  That sounds good to me.

So this brings me to another love of mine: cake.  I’m certain most of you can understand why it is a love of mine.  I mean, what’s not to love?  Sweet, moist, decadent, melt-in-your mouth cake.  Now there is this thing called coffee cake.  Match made in heaven, right?  Well, the thing is, coffee cake doesn’t actually have coffee in it at all.  I mean, don’t get me wrong, I like coffee cake and everything, but it really should just be called cinnamon cake.  Adding coffee to the name just builds up all this expectation of coffee flavored cake and my hopes are always dashed.  Well, no more.  I give you:

Real Coffee Cake with Dark Chocolate Ganache

  • 2 ½ cups oat flour or whole wheat pastry flour (I used half and half)
  • 1 teaspoon baking powder
  • 1 teaspoon baking soda
  • 1 teaspoon salt
  • 1 teaspoon cinnamon
  • 1 ½ cups raw sugar
  • ¾ cup butter (or any substitute)
  • 1 cup milk (I used coconut milk)
  • ½ cup applesauce (in place of 2 eggs)
  • 1 teaspoon almond extract
  • 2 tablespoons ground coffee (I used Kona)

Mix all your dry ingredients, except the raw sugar, together.  Then mix all your wet ingredients with the raw sugar and heat for about 1 minute in the microwave to dissolve the sugar and melt the butter.  Then mix the wet ingredients into the dry ingredients and mix with a hand mixer.  If you want to add a cinnamon crumble, pour a portion of the cake batter into a muffin tin to bake two muffins.   Pour the rest of the cake batter into an oiled cake pan and bake for about 20-30 minutes at 350.

Once the cake is baked through, take out of the oven and let it cool a bit before take it out of the cake pan.

Now it’s time to make the dark chocolate ganache.  Don’t you love that word, ganache?  I do.  Even the word sounds delicious.

Dark Chocolate Ganache

  • ½ cup coconut milk (I’m sure soymilk would work as well)
  • 1 tablespoon coconut oil
  • 4 semi-sweet chocolate baking squares (I used Baker’s.  If you don’t have baking bars, just add whatever chocolate you have until consistency seems right)

Pour the milk and coconut oil into a saucepan and heat on low to medium heat until warm.  Once it’s warm, begin to melt the chocolate into the saucepan.  When the ganache is done, it will have a silky texture.

Now you can coat your cake with this amazing goodness.  Then sprinkle your cinnamon crumble over it and stick it in the fridge to harden up.

It really is perfection.

~Elesha, a skinnyfat girl